Part II · Shelter and Sleep
The 20% Rule for Backpacking
Carrying It All
How do you choose a backpack?
Choose in this order: measure your torso length (the size that matters; height is nearly irrelevant), pick a capacity for your real trips (50–65 liters covers most weekend-to-multiday backpacking), then fit-test with weight in the store or living room. Features and brand come last, and the hipbelt fit outranks everything.
A backpack is the one gear purchase where "try before you buy" stops being advice and becomes the method, because packs are clothing. The same excellent pack fits one body like a handshake and another like a headlock, and no review can predict which body is yours. So this chapter front-loads the two measurements and the fit sequence; armed with those, an hour in a store (or a living room full of return-eligible boxes) beats a month of reading.
One reassurance for the campground crowd: if your camping is car camping, you don't need any of this yet, and a duffel is honestly better for trunk life. This chapter is for the on-ramp Chapter 1 promised: when the alpine lake starts calling, here's how everything gets there on your back without your back filing a grievance.
Torso length: the measurement that is the size
Pack sizes (XS through L, or numeric torso ranges) key on torso length: the distance from your C7 vertebra (the bony bump at the base of a bowed neck) to an imaginary line between the tops of your hip bones (the iliac crest shelf your hands find when you put hands on hips). Measure it once with a friend and a soft tape; it decides your size in every brand.
The measurement takes two minutes. Bow your head, find the knob at the base of the neck. Hands on hips, thumbs pointing back and level, marking the crest line. A friend runs the tape down the spine's curve between the two. Typical adult torsos run 16–21 inches, and pack size charts map ranges to sizes (many packs also offer adjustable torsos, worth their small weight penalty for growing teenagers and cross-body households).
Why height fails as a proxy: legs. Two six-footers can carry three inches of torso difference, and the long-legged one who buys "large because I'm tall" gets a hipbelt riding on his ribs. The belt must sit on the iliac crest, that bony shelf, because the entire modern pack design (next section) is a machine for standing weight on that shelf. Wrong torso length and the machine can't reach its foundation.
Capacity: liters for actual trips
Liters measure total volume, and the honest mapping: 20–35 L for day hikes (Chapter 12), 40–50 L for ultralight or summer weekends, 50–65 L for the standard weekend-to-multiday kit, 65–80 L for week-long trips, winter loads, or the family hauler carrying the kids' sleeping bags. When torn between sizes, take the smaller; volume expands to fill itself.
That last clause is a law of nature. An 80-liter pack whispers "there's room for the camp chair," and its owner hikes with a chair, a second stove, and a hardcover book at mile seven. Modern gear packs small: the Chapter 7–10 kit (tent share, 20°F bag, insulated pad) plus kitchen and clothing fits a 55–60 L pack with room for food, which is why that band dominates first-pack recommendations.
Capacity interacts with weight discipline. The working ceiling for comfort is a loaded pack around 20% of body weight (a 160-pound hiker at 32 pounds), with day loads nearer 10%. Those aren't performance targets to earn; they're comfort boundaries the fit sequence assumes. Past them, even a perfect fit rides heavy, and the fix is subtraction, not straps.
Pack anatomy: how the machine works
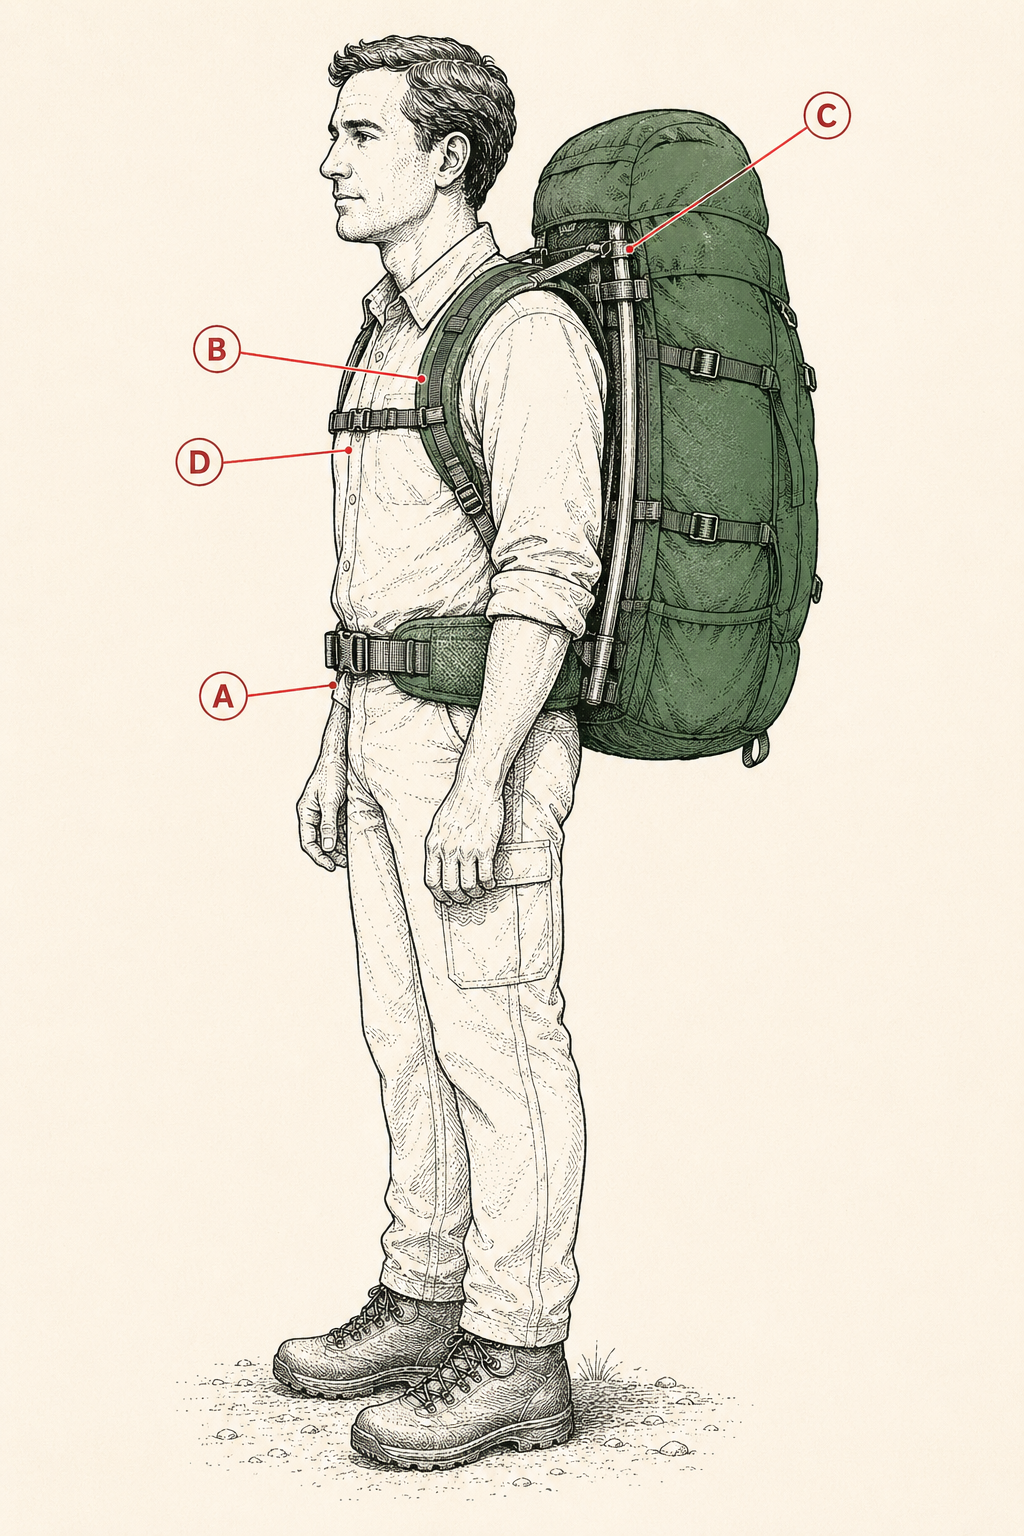
A modern internal-frame pack is a weight-routing machine: the frame sheet and stays collect the load, the hipbelt delivers roughly 80% of it to your iliac crest (bones, then legs, which are built for exactly this), and the shoulder straps' real job is holding the pack against your back, not carrying it. Every strap on the harness serves that routing.
Name the players once. The hipbelt wraps the crest, padded wings forward, buckle centered. Shoulder straps curve over without gaps and without bearing the load. Load-lifter straps run from strap-tops to the frame at roughly 45 degrees, tilting the pack's mass over your hips. The sternum strap clips across the chest to set strap spacing. Compression straps on the pack body cinch the load against the frame so it can't slosh. When people say a pack "carries well," they mean this machine is reaching their bones; when a pack "carries heavy," some link in the chain (usually belt position or torso length) is broken.
The five-step fit sequence
Fit every pack, every time you put it on, in the same order: loosen everything, then (1) hipbelt seated on the crest and buckled snug, (2) shoulder straps snugged until they contact without lifting the belt, (3) load lifters tensioned to about 45 degrees, (4) sternum strap clipped at mid-chest, comfortable breath-width, (5) one bounce and micro-adjust. Ten seconds once learned, and it's the difference between a pack you wear and a pack you fight.
- Seat the hipbelt. Pad wings centered on the iliac crest (not the waist, not the hips' widest point). Buckle firm: this is the foundation, and vague here is heavy everywhere.
- Snug the shoulder straps. Down and back until the straps wrap the shoulders with no daylight. If the belt lifts off the crest, you've over-tightened: the shoulders just stole the load.
- Tension the load lifters. Gentle pull until the pack's top leans over your hips; the straps should sit near 45 degrees. Cranked vertical means the torso is too long; drooping flat, too short.
- Clip the sternum strap. Mid-chest, snug enough to set strap spacing, loose enough to breathe. It's a positioner, never a weight-bearer.
- Bounce and tune. Two hops. The pack should move with you, not after you. Re-snug the belt (loads settle), and go.
In the store, do all of this with 20–30 pounds of shop sandbags loaded, walk stairs for ten minutes, and pay attention to hotspots at the crest and collarbones. Any hotspot at minute ten is a blister factory at mile ten. That's information the empty-pack twirl in front of the mirror cannot give you.
How to pack a backpack: the zone method
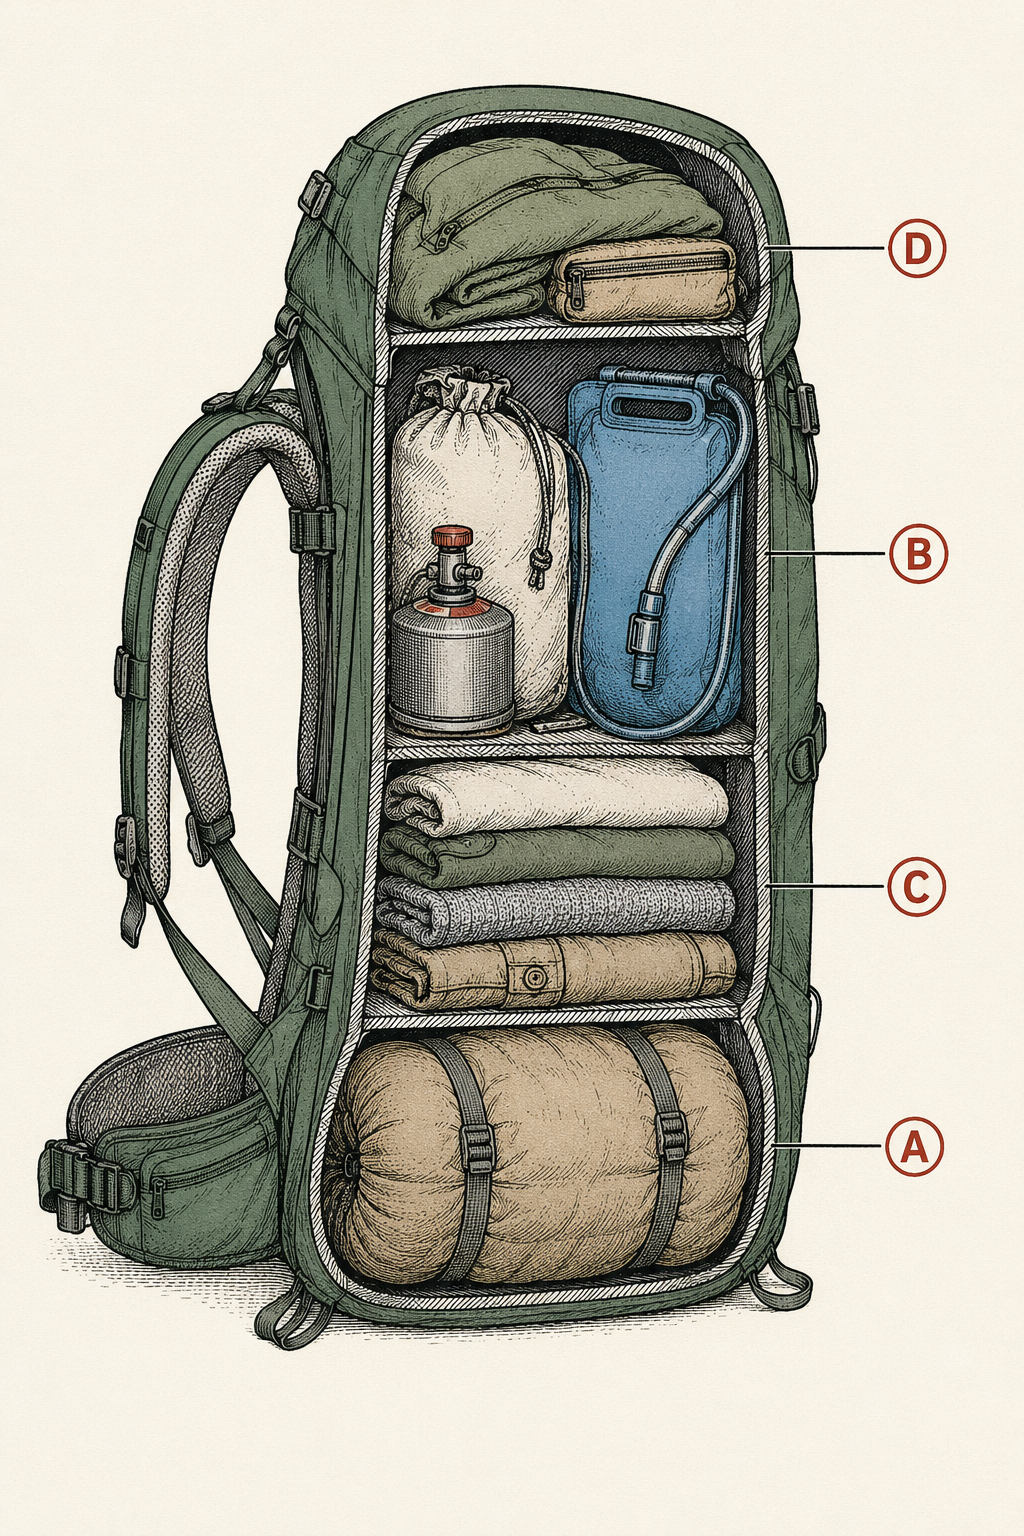
Pack in three zones: bottom for light-and-later (sleeping bag, sleep clothes), core against the spine for dense-and-heavy (food bag, water, stove fuel), outer and top for light-and-frequent (layers, snacks, first aid, rain shell). Heavy mass close to your back and centered between shoulder blades is the entire science; everything else is habit.
The physics is lever arms: weight far from your spine multiplies its felt load and swings like a pendulum on every step. The same 30 pounds packs into a limp, exhausting mess or a tight, forgettable one. So: bag into the bottom (it's the thing you need last and it fills odd space), then the heavy trio stacked against the frame sheet at mid-back height, then clothing packed around them as living padding that stops the slosh, then the day's needs where hands can reach. Tent bodies split well (fabric inside, poles strapped outside along the frame), and the pad straps under or rides inside against the back panel by preference.
The accessibility layer matters more than beginners expect: rain shell, warm hat, snacks, water treatment, headlamp, and the map live in the lid, hip pockets, and outer stretch pocket, because gear buried is gear unused, and a hiker who won't stop to dig for the shell hikes wet. Camp shoes clip outside. Nothing metal clips outside to swing and clank; the forest will thank you and so will your mile count.
Two closing rules. Compression straps snug after every packing, so the load and frame move as one object. And the same items live in the same places every trip: when the headlamp always lives in the lid's left pocket, 2 a.m. needs no search party.
Women's packs, kids' packs, and other fits
Women's-specific packs change the harness geometry (shorter torso ranges, canted hipbelts for different crest angles, narrower and differently curved shoulder straps), and like women's bags they're a fit tool: the right default for many women, wrong for some, always outranked by the actual fit test. Cross-shopping both charts is normal and smart.
Kids carry happiest with adjustable-torso packs bought for this year's measurement, loads capped nearer 10–15% of body weight, and their own fit sequence taught as a ritual (they find the hip-bone shelf faster than adults do, having less upholstery over it). A kid whose pack carries their snacks, water, and stuffed animal owns their hike; a kid mule-loaded by an ambitious parent files for early retirement at the first switchback. Chapter 51 expands the whole kid program.
For everyone: packs are re-fit points, not set-and-forget. Bodies change, loads change season to season, and the belt that sat perfectly at 25 pounds wants a re-seat at 35. The ten-second sequence exists to be repeated.
Daypacks and what transfers down
Everything above scales down to the 20–35 L daypack: the belt still beats the shoulders when there's a real belt, heavy still rides close and mid-back, and the fit sequence still runs in order (minus steps the simpler harness lacks). Chapter 12 builds the daypack's contents; the carrying skills are already yours.
The one thing that doesn't transfer: tolerance for fit sins. A 12-pound day load forgives a mediocre harness that a 32-pound overnight load would prosecute, which is why daypacks can be bought casually and backpacking packs cannot. If a single pack must do both jobs, buy the smaller backpacking pack (45–50 L) with a real hipbelt and cinch it down for day duty; a daypack pressed into overnight duty is the worse compromise in both directions.
Trailhead Takeaways
- Torso length is the size; measure C7 to the iliac-crest line once and shop that number in every brand.
- 50–65 liters covers most real backpacking. When torn, buy smaller; volume fills itself.
- The hipbelt on the bony crest carries ~80% of the load. Shoulders hold the pack close; they don't haul it.
- Fit sequence every time: belt, shoulders, load lifters to 45 degrees, sternum, bounce.
- Fit-test with 20–30 pounds and stairs. Minute-ten hotspots are mile-ten injuries.
- Pack by zones: bag low, heavy against the spine mid-back, day's needs reachable. Compress until it's one object.
- Comfort ceilings: ~20% of body weight loaded, ~10% for day loads, less for kids. Past them, subtract, don't strap harder.
Where Trips Go Sideways
- Buying by height. Six-foot-two, size large, and the hipbelt rode the bottom ribs while the load lifters pointed at the sky. Torso was 17.5 inches: a medium, said the tape measure nobody used.
- The empty-pack fitting. Weightless in the store mirror, everything felt great. At 28 pounds, the collarbone hotspots introduced themselves in the first mile. Sandbags and stairs, or the store didn't happen.
- Shoulder-strap addiction. Every ache prompted another strap crank until the belt hung loose and the shoulders carried everything, which is the exact inversion of the machine. When it rides heavy: loosen the shoulders, re-seat the belt, rebuild from the foundation.
- The dangling exterior. Mug on a carabiner, sandals swinging, foam pad low and loose: a pendulum orchestra adding felt-weight with every step and announcing the hiker to every ridge. Inside, or strapped flat and tight along the frame.
- Eighty liters of optimism. The big pack had room, so room got filled: 41 pounds for one summer night. The gear list wasn't the problem. The container was. Smaller pack, better trip.
Frequently asked
What is the 20% rule for backpacking?
Keep your loaded pack at or under roughly 20% of your body weight (day loads nearer 10%). It's a comfort ceiling, not a badge: past it, harness fit degrades, joints take the difference, and mileage stops being fun. Trim the big three (shelter, bag, pad) first when you're over.
Can backpacks cause lower back pain?
Badly fitted or badly packed ones, yes: a hipbelt riding off the crest, weight hung far from the spine, or a load past the 20% line all route force through structures that backs complain about, loudly and the next morning. The fixes are this chapter's fundamentals, in order. Persistent pain despite a correct fit and a sane load deserves a professional's eyes.
What are common mistakes first-time backpackers make?
The classics: buying by height instead of torso, fitting the pack empty, overpacking to the container's size, hanging gear outside to swing, and carrying the whole load on the shoulder straps. Every one is preventable at home, which is what this chapter and a 30-pound practice walk are for.
What order should I pack my backpack?
Sleeping bag and sleep clothes in the bottom; the dense trio (food, water, fuel) against your spine at mid-back; clothing wedged around them; frequent-use gear (shell, snacks, first aid, headlamp) in the lid and pockets. Then compress until nothing shifts when you shake it.