Part VI · Ranging Out
The Correct Way to Hold a Compass
The Needle That Never Lies
How do you use a compass?
Three skills cover camping's compass needs: orient the map (align its north with the world's), take a bearing (measure the direction to something you can see, or to somewhere the map shows), and follow a bearing (walk that direction without drifting). All three run on one move, "red in the shed": turning until the magnetic needle's red end sits inside the orienting arrow's outline. Learn the move, set your declination once, and the compass becomes what it's been for two centuries: the tool that always knows.
The compass belongs in the kit (Chapter 12 packed a button version; this chapter upgrades it) because it's the navigation layer that never fails: no battery, no signal, no screen glare, no cold-sag. Its price is skill, paid once, in the yard and the campground, before it's ever needed for real. The pairing with Chapter 40 is total: a compass gives directions between points; the map names the points. Together they're navigation. Alone, each is a party trick.
Buy the tool this chapter assumes: a baseplate compass with adjustable declination (a small screw or key setting), which costs modestly more than the toy tier and deletes this subject's only genuinely confusing part on day one.
Compass anatomy: six parts, one machine
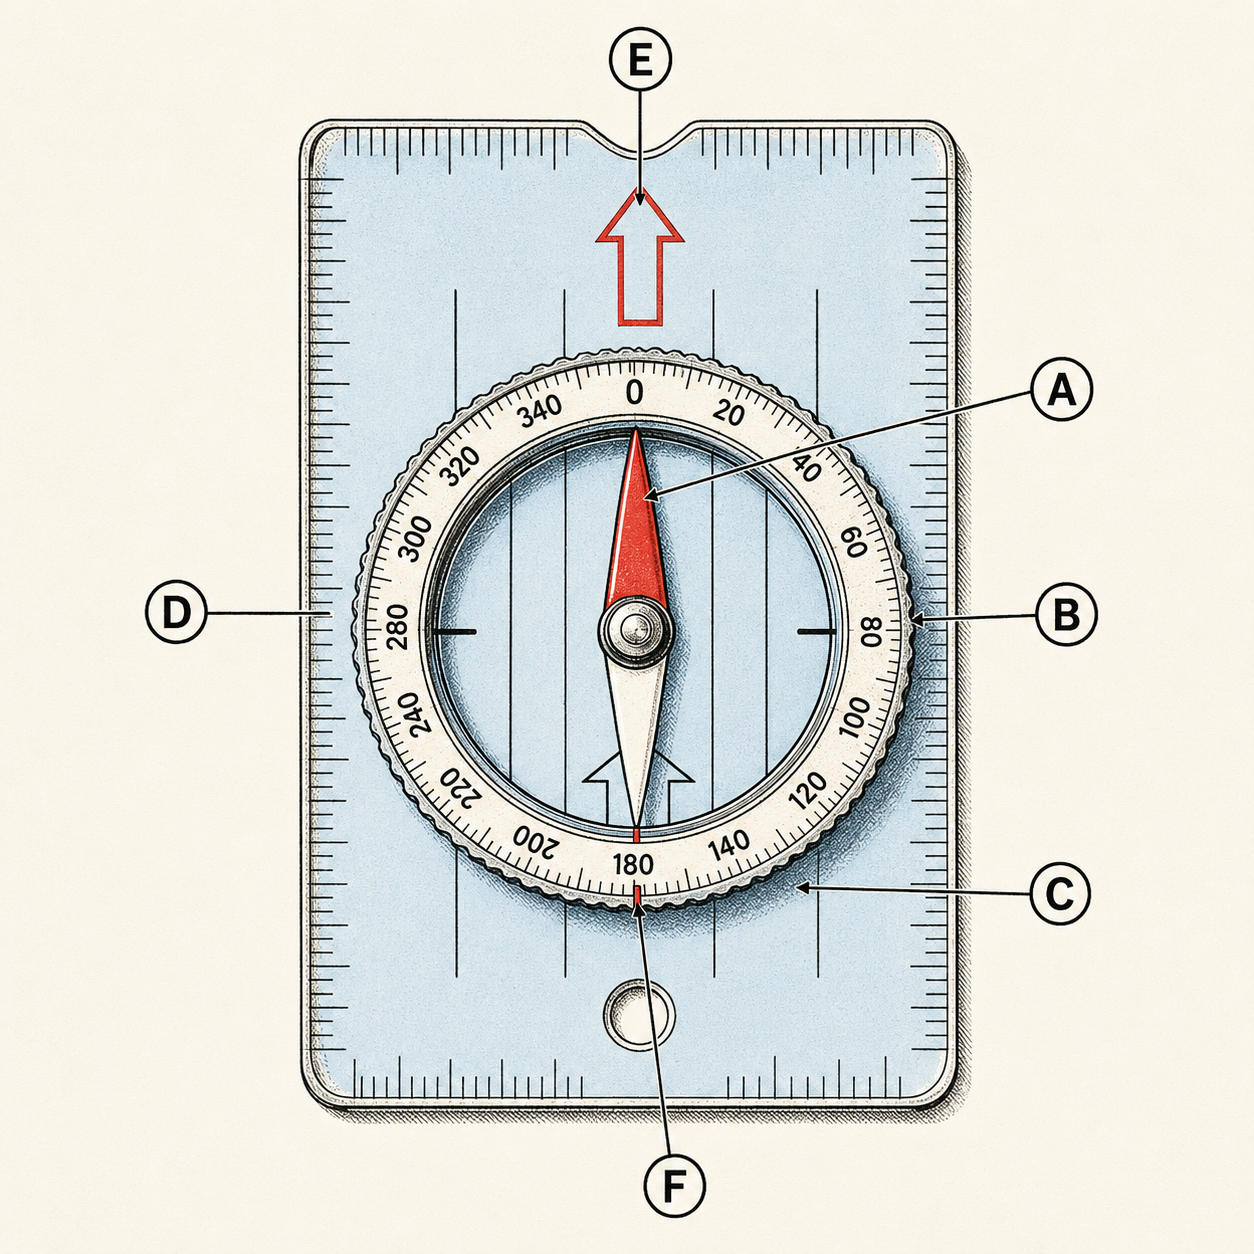
The baseplate compass is six working parts: the magnetic needle (red end seeks magnetic north, always, and that's all it does), the rotating bezel (the ring marked 0–360 degrees), the orienting arrow ("the shed": the outline printed in the housing that the needle parks inside), the orienting lines (parallel lines in the housing floor that align with a map's north-south grid), the direction-of-travel arrow (on the baseplate, pointing where you'll walk), and the index line (where you read your bearing off the bezel). The clear baseplate itself, with its ruler edges, is the map tool.
The division of labor that makes everything click: the needle only knows north; the bezel remembers your bearing. Every technique in this chapter is some arrangement of "set the bezel, then satisfy the needle." Once that clicks, the procedures stop being incantations and become obvious.
Holding it right (and away from your phone)
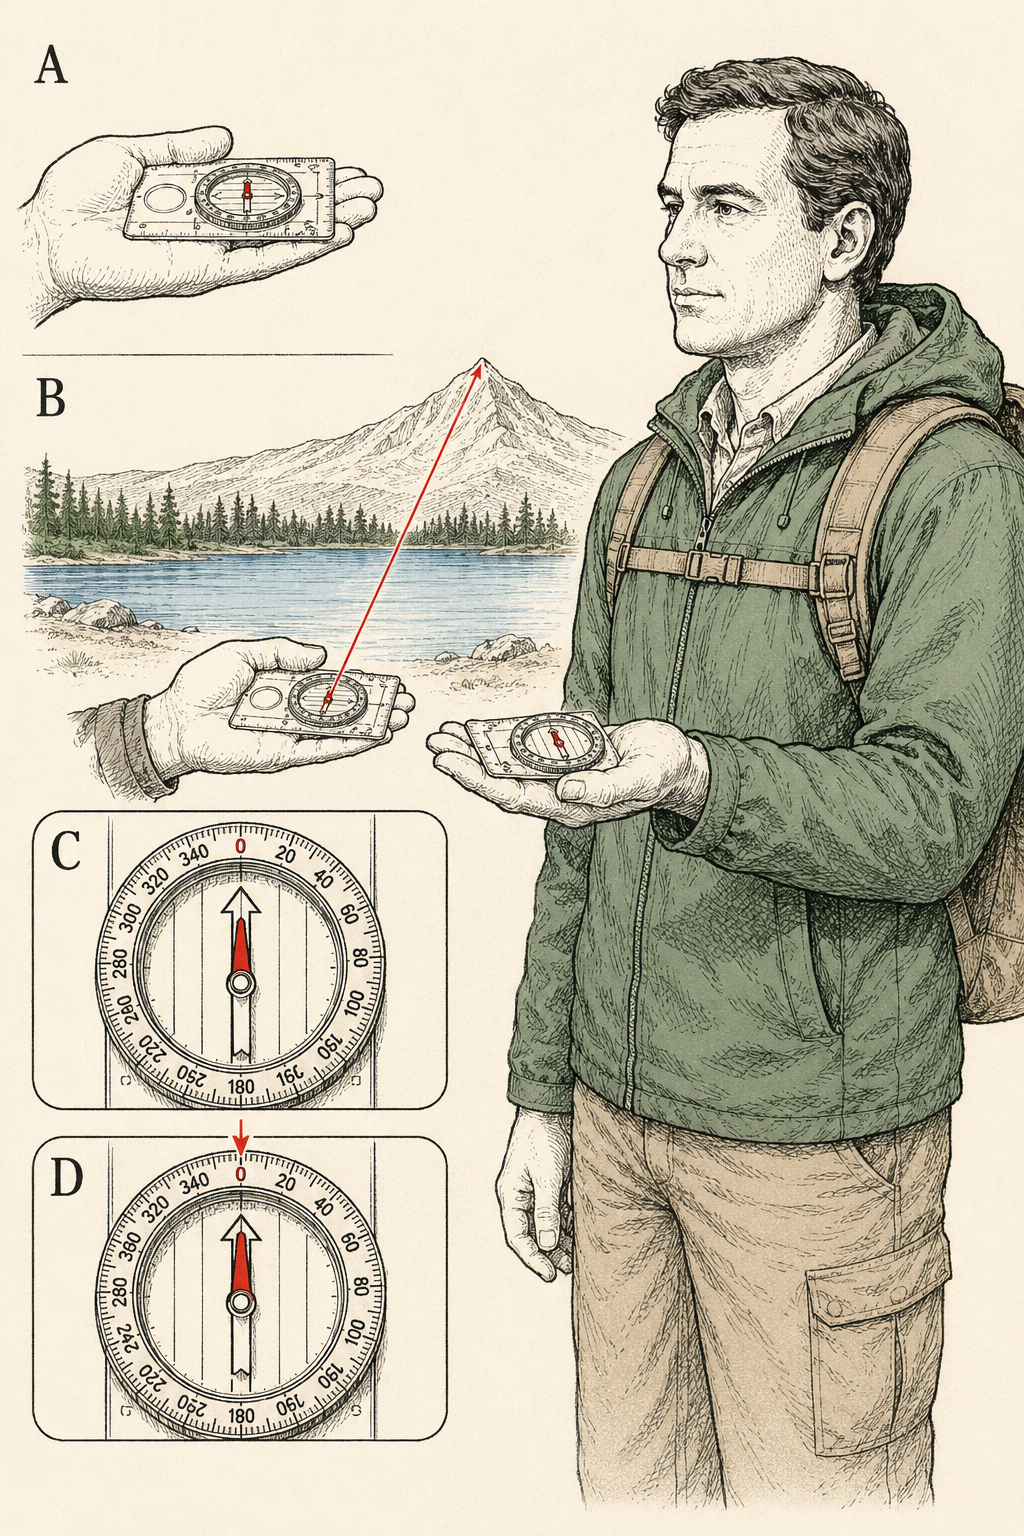
Hold the compass flat in an open palm at mid-chest, elbows at your sides, the direction-of-travel arrow pointing straight away from your navel, and turn your whole body (not the compass, not your wrist) when a technique says turn. Flat matters because a tilted needle drags its housing; square-to-body matters because your spine is the aiming post; whole-body turning keeps everything true.
The interference paragraph, which modern navigation teaching has to promote: magnets and steel bend the needle's truth, and campers now carry more of both than any generation before. Phones (speaker magnets, MagSafe rings), smartwatch clasps, the multi-tool in the chest pocket, zipper pulls, car hoods, and the metal-rim glasses you forgot: any of them, close enough, swings the needle degrees off. The rule: compass work happens an arm's length from electronics and steel, and a needle that disagrees with your expectation earns a two-step-away retest before you believe either reading.
Declination: solved once, then forgotten
The needle seeks magnetic north; maps are drawn to true north; the angle between them at your location is declination, and it ranges across the continental US from about 15 degrees east to 15 degrees west, changing slowly over years. Ignore it and every bearing you take is wrong by that amount, which at 10 degrees off means roughly 900 feet of sideways error per mile walked, easily the difference between the lake and the wrong drainage.
The modern solution, once: look up your area's current declination (printed on recent maps, or from the NOAA calculator online), set it on your adjustable-declination compass with the tiny screw, and the compass now reads true bearings directly, map and field matching forever until you travel far or years pass. This single setup step is why the adjustable compass was the buying advice; the add-east-subtract-west arithmetic that non-adjustable compasses require is learnable and is also where most compass errors are born, and this book sees no reason to keep the hazard around for the price of a sandwich.
The maintenance note: re-check the setting yearly and when you cross a few states. Declination drifts (the magnetic pole wanders), and old maps print old values, which the NOAA lookup corrects in thirty seconds.
Orienting the map
The foundational move, now with hardware: set the bezel to 0 (north at the index line), lay the compass on the map with its edge along a north-south line (the map's edge, a meridian, or grid lines), then rotate map-and-compass together until red sits in the shed. The map is now oriented: every feature on paper points at its real self, and Chapter 40's narrate-the-terrain skill runs at full power.
Oriented-map navigation alone (no bearings, no numbers) covers most on-trail needs: at every junction and viewpoint, orient, match paper to world, confirm the trail's direction agrees, proceed. It's fast, it's error-resistant, and it builds the running map-contact habit that Chapter 50 calls the real secret of never being lost. Bearings, next, are for when you leave the trail's handrail or need to identify or aim at something specific.
Taking a field bearing
To measure the direction to something you can see (the peak, the notch, camp's smoke): point the direction-of-travel arrow at the target (compass flat, body square), hold everything still while you rotate only the bezel until red parks in the shed, and read the number at the index line. That's the bearing, and the bezel now remembers it: 240 degrees to the saddle, written in plastic.
To follow it: keep red in the shed and walk where the direction-of-travel arrow points. The drift-free technique is leapfrogging: sight along the arrow, pick the farthest distinct object on that line (a lightning-struck snag, a boulder), walk to it freely (around obstacles, eyes up), then re-sight the next object from there. You navigate object to object, not needle-stare to stumble, which is faster, safer, and immune to the gradual veer that plagues needle-watchers.
The reverse gear rides along free: a back bearing (the way home) is your bearing plus or minus 180 (240 out means 60 back), or, with zero arithmetic, keep the bezel set and walk with the white end in the shed instead. Take the bearing to camp before you wander from it, and the whole outing gains an undo button.
From map to world and back
Map bearing (aim at somewhere you can't see yet): lay the compass edge connecting where-you-are to where-you're-going on the map (direction-of-travel arrow toward the destination), rotate the bezel until its orienting lines run parallel to the map's north-south lines (shed pointing to map-north; ignore the needle entirely during this step), lift the compass, and read the bearing at the index. Now stand, turn until red's in the shed, and the arrow points at your invisible destination. Leapfrog away.
Finding yourself (triangulation): identify two (better, three) visible landmarks you can also find on the map, take a field bearing to each, then draw each bearing's line back from its landmark on the map (the compass edge, again, laid through the landmark with the orienting lines matched to map-north). Where the lines cross is you, within a small triangle of honesty. Two lines locate; the third audits. This is the skill that converts "somewhere on this ridge" into a dot, and practicing it once from a known spot (a campground with a view) installs it permanently.
The habit that makes all of this cheap: bearings get taken when life is easy (at the trailhead, at the viewpoint, before the fog) rather than when they're needed. A bearing costs thirty seconds standing somewhere pleasant, and it's the cheapest insurance in this book's whole navigation suite.
Practice: the campground curriculum
The skills install in an afternoon of games. The yard course: set a bearing, walk it 50 paces, set the back bearing, return; ending within a stride of the start certifies the fundamentals. The campground triangulation: find yourself on the map from the picnic table using the water tower and the peak; check against the "you are here" truth. The junction habit: orient the map at every trail junction all weekend until it's automatic. The kid version: a treasure bearing ("walk 120 degrees for 40 paces") hides candy and mints navigators, and Chapter 51 endorses the bribery without reservation.
The drills matter because compass skills decay pleasantly and fail expensively: the camper who last took a bearing three summers ago fumbles it in fog, which is precisely when fumbling costs. Five minutes a season keeps it, the way Chapter 34's pocket cord keeps knots.
And the closing frame for the whole chapter, honestly stated: Chapter 42's digital tools are better at most daily navigation than this chapter's, and this chapter is better at never failing. The complete camper runs both: the phone for convenience, the paper-and-needle for the layer beneath, checked against each other, per Chapter 12's failure-independence doctrine.
Trailhead Takeaways
- One move runs everything: set the bezel, then satisfy the needle ("red in the shed"). The needle knows north; the bezel remembers your bearing.
- Buy adjustable declination, set it once from NOAA's current figure, and the whole add-east-subtract-west hazard disappears.
- Hold it flat, mid-chest, square to your body, an arm's length from phones, watches, and steel.
- Field bearing: point, bezel until red's in the shed, read. Follow by leapfrogging objects, never needle-staring.
- Back bearing free of charge: white in the shed walks you home. Take the bearing to camp before you leave it.
- Map bearing: edge connects here-to-there, orienting lines parallel to map-north, ignore the needle, read, then turn and go.
- Triangulate from two or three known landmarks to become a dot instead of a guess.
- Practice when it's easy: yard course, campground triangulation, the junction habit, the candy bearing.
Where Trips Go Sideways
- The bearing taken next to the phone. MagSafe ring, chest pocket, eight degrees of quiet error, and a confident walk toward the wrong notch. Arm's length from electronics, and re-test any needle that surprises you.
- Declination, unhandled. The map said the lake bore 310; the un-adjusted compass agreed while lying by 12 degrees; the party found the wrong drainage on schedule at 900 feet of error per mile. The adjustable screw was the whole fix, set once at home.
- Needle-staring. Eyes locked on the housing, feet drifting with every obstacle, a veer that compounded for a mile. Sight an object, walk to the object, re-sight. The needle points; the snag navigates.
- The unwritten bearing. "I'll remember camp's direction" lasted until the fog didn't. The bezel remembers numbers precisely so heads don't have to; taking the home bearing costs thirty easy seconds.
- Skills from three summers ago. The technique lived in memory right up until it was needed in weather, where it fumbled. The five-minute seasonal drill is the maintenance schedule; run it at the campground where fumbling is free.
Frequently asked
How do you know which way is north on a compass?
The needle's red end always points toward magnetic north; that's its entire job. Map-matching north (true north) differs by your local declination, which an adjustable-declination compass corrects permanently after one setup. When the needle behaves oddly, check for phones, watches, and steel within arm's reach.
How do I read my compass?
Your direction of travel reads at the index line where the bezel meets the baseplate. To read the direction you're facing: hold the compass flat and square to your body, rotate the bezel until the red needle sits inside the orienting arrow, and the index line shows your heading in degrees.
What is the correct way to hold a compass?
Flat in an open palm at mid-chest, elbows at your sides, direction-of-travel arrow pointing straight away from your body, turning your whole body rather than your wrist. Tilt drags the needle, off-square aiming skews bearings, and nearby metal or electronics bend everything; keep them an arm's length off.
How do you read a map with a compass?
Two staples: orient the map (bezel to 0, compass edge on a north-south line, rotate map and compass together until red's in the shed) so paper matches world; and take map bearings (edge connects you to your destination, orienting lines parallel to map-north, read the index, then turn until red's home and walk). Triangulation runs the same moves backward to find yourself.