Part II · Shelter and Sleep
How to Find a Leak in a Sleeping Pad
Field Fixes
What goes in a gear repair kit?
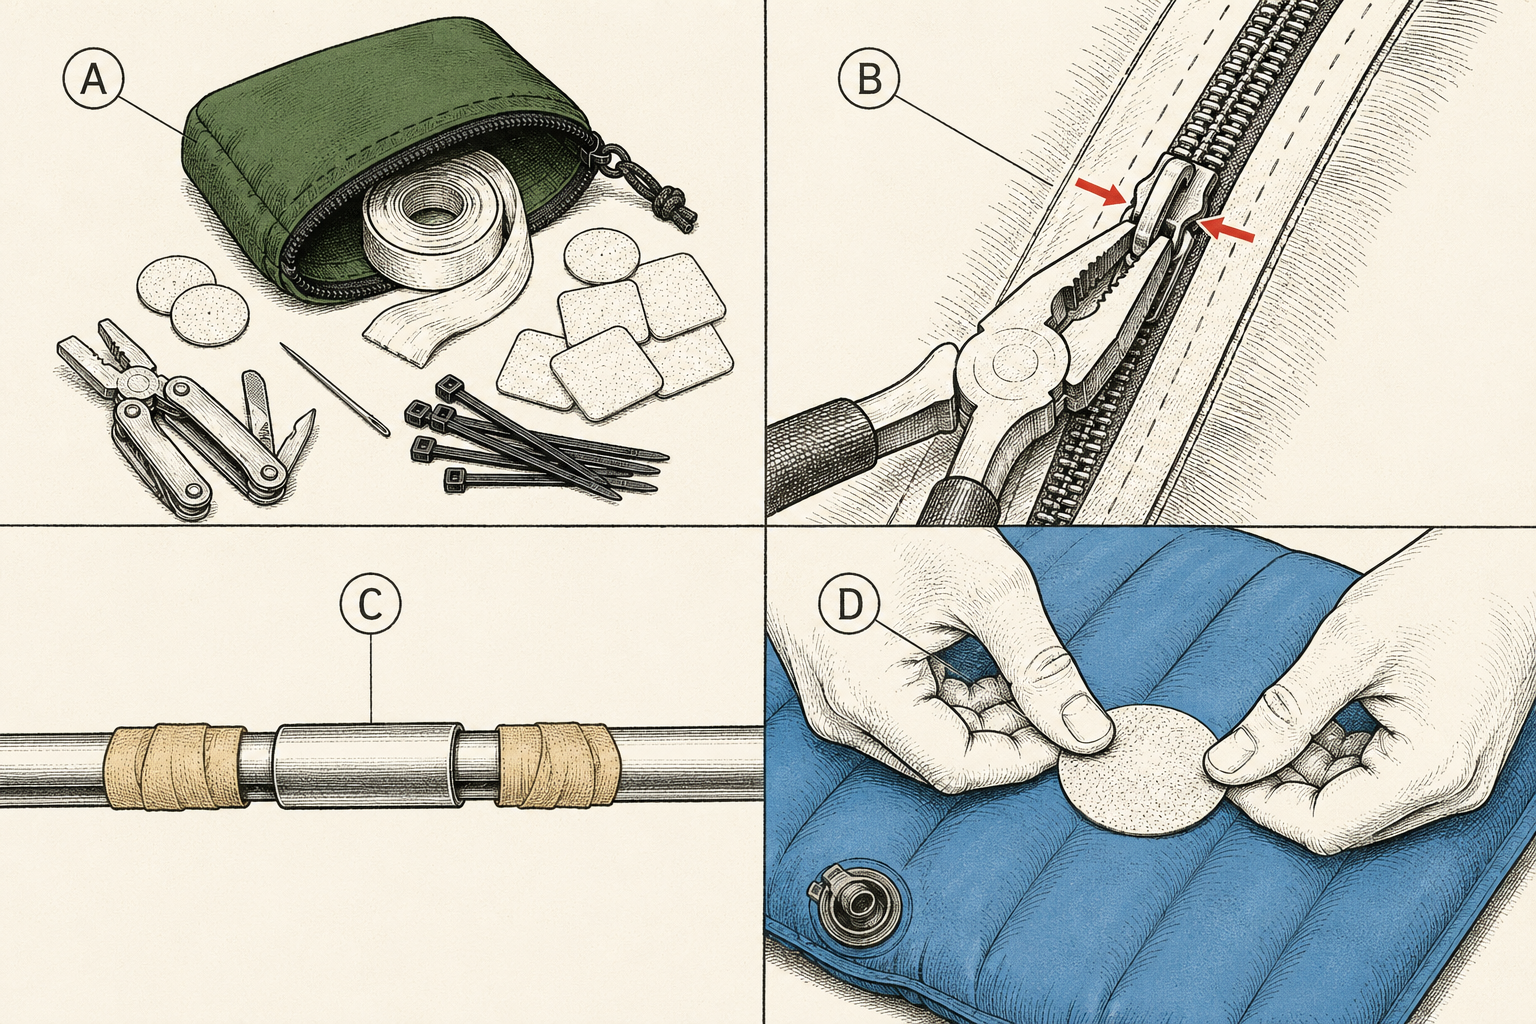
The core kit weighs a few ounces and fixes 90% of field failures: a flat wrap of duct tape, pre-cut adhesive fabric patches (Tenacious Tape or equivalent), the pad patches that came with your pad, a tent-pole splint sleeve, a needle with heavy thread, a few zip ties and safety pins, a mini multi-tool, and a short length of cordage. It lives in the daypack from Chapter 12 and never unpacks.
The philosophy before the procedures: field repair is triage, not restoration. The job at camp is "works until home," done in minutes with what's in the pouch; the beautiful permanent fix happens at the kitchen table. Campers who internalize that stop fearing gear failure entirely, because almost nothing that breaks at a campsite can't be taped, splinted, or zip-tied back into service for a weekend. The gear that can't be (a stove's burst fuel line, a shattered pole hub in a storm) is why Chapter 6 packed margins.
One addition per gear type you carry: pads want their branded patch kit, inflatables' valves occasionally want the spare o-ring taped inside the stuff sack, and glasses-wearers want the tiny screwdriver. Audit your own kit against your own gear once; the pouch personalizes fast.
Duct tape and fabric patches: the 90% tools
Adhesive fixes come in two grades: duct tape for structure and desperation (wrapped flat around a lighter or trekking pole, never carried as a roll), and purpose-made fabric repair tape for anything you want to survive the trip and the wash. The technique is identical and it's the whole game: clean, dry, round the corners, press hard.
Expanded, because those four steps decide whether a patch lasts hours or years: clean the surface (an alcohol wipe from the first-aid kit, or soap and full drying), cut the patch with rounded corners (square corners peel; round ones don't; this one scissor-trick doubles patch life), size it an inch past the damage in every direction, and press from center outward with real pressure for a full minute, then let it rest unstressed as long as you can. On silicone-coated fabrics (many ultralight tents), standard adhesives skate; that's a seam-grip-and-home-bench job, and the field answer is tape plus low expectations.
Where each grade goes: duct tape on boot rands, pole splints, cooler hinges, and anything structural; fabric tape on tent fly and body, bag shells, puffy jackets (patch the hole before the down leaves, and pick the patch color you can live with, because it's permanent), pack fabric, and rain gear.
Finding and fixing a pad leak
A slow pad leak is found with ears, suds, or submersion, and fixed with a patch in ten minutes. The overnight sag that isn't a leak is real too (cold air contracts; new pads stretch), so confirm before surgery: inflate hard, listen close over the surface, then paint suspect zones with soapy water and watch for the bubble bloom.
- Over-inflate slightly and work in a quiet spot. Pass ear and wet lips (surprisingly sensitive) over the surface, especially seams and valve.
- Suds the suspects. Soapy water on face, seams, valve base. A leak blows a bubble cluster within seconds. Creekside version: submerge sections and follow the bubble stream.
- Mark it (the pen you don't have; scratch an X of tape corners around it), dry the area completely, and alcohol-wipe.
- Patch per the kit : modern glue-dot patches press on and hold in minutes; glue-and-patch kits want thin glue, full dry, then the patch, pressed hard.
- Test at half pressure for an hour before trusting it overnight. Valve leaks (bubbles at the stem) mean the o-ring or a dealer call, and the foam pad from Chapter 10's stack finishes the night either way.
Zipper triage: the fix is usually the slider
Zippers rarely break; sliders wear out, and a worn slider (the zipper "closes" then gapes open behind) is fixed in the field by gently crimping the slider's back plates with pliers, a quarter-squeeze at a time, testing between squeezes. That one move revives most "broken" tent and bag zippers on the spot.
The rest of zipper medicine, in frequency order. Fabric caught in the slider: stop pulling (pulling is how a snag becomes a tear), back the slider off while easing the fabric out sideways. Gritty, sticky zipper: it's eating dust; brush the teeth clean (toothbrush), then lubricate with zipper wax, a candle stub, or bar soap. Separated teeth behind a closed slider: run the slider back past the gap and re-close; if teeth are actually missing, park the slider away from the gap and treat the zipper as shorter. Pull tab snapped: a zip tie or a loop of cord through the slider body, done, and honestly better in gloves.
Sand and grit are the whole villain story. Zippers on beach and desert trips want a daily brush-off, and tent zippers want you to stop operating them one-handed at an angle (the side-load bends sliders open, which is where the crimp fix came from).
The tent-pole splint
A broken or kinked pole section is field-fixed with the splint sleeve (the short aluminum tube that came with your tent and lives in the repair pouch): slide the sleeve over the break, center it, and tape both ends hard. The pole flexes on, the pitch survives, the trip continues.
No sleeve? A tent stake splinted along the break with half your tape wrap does the same job uglier, and a stick does it uglier still; the principle is just rigidity across the wound. What doesn't work is optimism: a kinked pole that "seems fine" concentrates its next failure at the same spot, usually in wind, usually at night. Splint it now, and at home order the replacement section (pole makers and tent brands sell them; shock-corded poles rebuild with a fresh section in twenty minutes, and it's a genuinely satisfying kitchen-table job).
Prevention costs nothing: assemble poles by seating each ferrule fully before flexing (the half-seated joint is where poles die), never whip-crack the shock cord to assemble, and keep poles out of doorways and from underfoot, where most breaks actually happen.
Tears, seams, and the leaking fly
Fabric tears get the patch protocol (both sides for structural tears). Leaking seams get seam sealer at home, on a pitched dry tent, in a thin bead you then leave alone overnight. And the fly that "leaks everywhere at once" usually isn't torn or unsealed at all: either its DWR coating is exhausted (water soaks in instead of beading) or it's not leaking, it's condensation (Chapter 31 sorts the diagnosis: condensation is on the inside of a cold fly, evenly; leaks are localized and trace to a seam or wound).
DWR (durable water repellent) is the factory finish that makes water bead on flies, shells, and pack fabric, and it wears off as a matter of schedule, not defect. The restoration is home care: wash the item clean (dirt is DWR's first killer), then reactivate with heat (dryer, low, or a cool iron over a cloth), and when beading still fails, apply a spray-on or wash-in DWR treatment. The same treatment schedule keeps rain shells breathing, which Chapter 24 cares about deeply.
Floor delamination, coating flaking, and sticky waterproofing on old gear is polyurethane hydrolysis: age plus stored humidity. It's reversible-ish once (strip and recoat), a fair kitchen-table project for a loved tent, and the retirement bell for a cheap one.
Boots, buckles, and the miscellaneous saves
The rest of the field-fix repertoire, rapid fire. Boot sole peeling: duct tape wrap to finish the day, real shoe adhesive (and clamps, and 24 hours) at home. Blown pack buckle: zip ties through both halves, or the spare side-release buckle a smart kit carries in the two sizes your pack uses. Snapped bootlace: the cordage in the kit, and the ends melted or taped. Camp chair's torn seat: duct tape now, needle and thread later. Cracked water bottle: retire it (adhesives and drinking water are a bad marriage); the margin bottle covers the gap. Stove and filter fixes are their own chapters' business (14 and 17), but both reward the same habit: carry the tiny maintenance kit the maker sells, because a $12 o-ring kit has saved a thousand dinners.
The meta-skill across all of it: fix it tonight, at camp, while the failure is small and the light is good. The zipper that gapes a little tonight gapes fully at 2 a.m.; the slow pad leak becomes the 3 a.m. floor. Gear fails on a schedule, and the schedule prefers the worst hour available.
Home care: the maintenance calendar
Field fixes buy time; home habits buy decades. The calendar is short. After every trip: everything bone dry before storage (tent, fly, footprint, bags, pads: mildew is unfixable and Chapter 2 already made this law), sand brushed out of zippers, kit restocked. Each season: wash what's dirty (bags per Chapter 9, shells per Chapter 24's DWR routine), seam-check the tent on a sunny pitch, run the stove and change what sputters. Each year: inventory against the gear list, replace the pad patches you used, re-treat DWR that stopped beading, and actually send the warranty-covered failures in (the good brands' repair programs are camping's best-kept secret, and they fix things cheaper than replacement every time).
None of this takes an afternoon. All of it, skipped, is how five-year gear becomes two-year gear, and why the used market is full of "barely used" tents with mildewed seams.
Trailhead Takeaways
- Field repair is triage: works-until-home, in minutes, from a few-ounce pouch that never unpacks.
- Patch law: clean, dry, rounded corners, pressed hard. That sequence is the difference between hours and years.
- Pad leaks: confirm with suds (cold-night sag lies), patch per kit, test at half pressure. Valve bubbles mean o-ring.
- "Broken" zippers are usually worn sliders: crimp the back plates gently, quarter-squeeze at a time.
- Poles: splint sleeve over the break, tape hard, replace the section at home. Seat ferrules fully, always.
- A fly that fails everywhere at once is DWR or condensation, not a leak. Wash, heat, re-treat.
- Fix it tonight. Failures scheduled themselves for 2 a.m. long before you noticed them.
Where Trips Go Sideways
- Pulling the snag through. The fly fabric caught one tooth, the pull got firm, and a snag became a three-inch tear with a zipper through it. Back the slider off. Ease the fabric sideways. Pulling is the injury.
- Square patches. Applied with care, peeled by Sunday, because corners are levers. The scissors were right there. Round the corners and the same patch outlives the pad.
- Diagnosing the sag as a leak. Twenty minutes of suds found nothing because nothing was wrong: the pad was taut at 70°F and soft at 40°F, as gas laws require. Top it up two nights before performing surgery.
- The kinked pole given a second chance. It held fine on the calm night and folded at the kink when the front arrived, taking the fly down at 1 a.m. Kinked is broken. Splint it while the sun's out.
- Wet gear, sealed bins, long winter. The May unpacking revealed the mildew constellation across the fly, permanent and fragrant. Nothing in this chapter fixes it. Bone dry before storage is the one rule with no repair.
Frequently asked
How do you find a leak in a sleeping pad?
Over-inflate, then listen and feel across the surface (lips are sensitive leak detectors). No luck: paint seams and valve with soapy water and watch for bubbles, or submerge sections creekside. Mark it, dry, alcohol-wipe, patch with rounded corners, test at half pressure.
How do you fix a zipper that separates?
That's a worn slider, gear repair's most common "fatal" failure. Run the slider back past the gap, then gently crimp its back plates with pliers, a quarter-squeeze at a time, testing between. The crimp restores the geometry that presses teeth together. Sliders are also cheaply replaceable at home.
Can you repair a broken tent pole in the field?
Yes: slide the splint sleeve (the short aluminum tube that shipped in your tent's stuff sack) over the break, center it, and tape both ends firmly. No sleeve on hand: splint a tent stake or straight stick along the break with half your tape wrap. The pitch survives the weekend either way; the permanent fix is a replacement pole section, a satisfying twenty-minute home job.
When should you repair gear versus replace it?
Repair wins for localized damage on good bones: tears, punctures, sliders, pole sections, worn DWR. Replacement wins for systemic failure: delaminating coatings, foam gone flat, fabric UV-rotted enough to tear at a pinch. In between, check the maker's repair program first; it's routinely cheaper than the cart.