Part III · The Camp Kitchen
How Long Will Ice Last in a Cooler?
Cold Food, Safe Food
How do you pack a cooler that keeps ice?
Pre-chill the cooler overnight, use a 2:1 ratio of ice to contents, favor block ice over cubes, pack food frozen or fridge-cold in layers with ice between, fill every air gap, and then discipline the lid. Do all six and a decent cooler runs three days; skip them and a premium cooler runs one.
That sentence inverts how most people shop, so here's the argument early: cooler performance is mostly practice, not product. Ice melts by absorbing heat, and heat enters three ways: through the walls (what you paid for), through warm contents (what you packed), and through the open lid (what your family does forty times a day). The walls are the smallest door of the three. A modest cooler packed cold and opened rarely embarrasses an expensive one packed warm and browsed like a fridge, which is why this chapter is techniques first and shopping last.
The safety stake underneath the convenience: perishables live below 40°F (4°C) or they don't live at all. The cooler isn't keeping drinks pleasant; it's running cold-chain logistics for your potato salad, and the standards are the same ones your fridge obeys.
Pre-trip: the cold starts at home
Cold is packed, not created: a cooler preserves the temperature its contents arrive with and manufactures nothing. So the trip's refrigeration begins two days early: freeze everything freezable (meats, chili, water bottles, juice), fridge-chill everything else, and pre-chill the cooler itself overnight with a sacrificial bag of ice or frozen jugs.
Pre-chilling is the step that separates the three-day cooler from the one-day cooler, because a room-temperature cooler is a 70°F thermal mass that spends your first bag of ice just cooling its own walls and lid. Cold walls first. Then groceries. Sacrifice cheap ice to that job the night before, drain it at packing time, and the real ice starts work in a cold box instead of a warm one.
The freezer strategy does double duty: frozen chili is ice for two days and dinner on night three, frozen water bottles are ice that becomes drinking water, and meat packed frozen holds the bottom of the cooler at fridge temperatures while it slowly thaws toward its cooking date. Plan the menu so the fragile fresh things (night one's steak, the berries) ride on top for early use and the frozen things anchor the bottom for later. Chapter 18 builds menus in exactly this order.
Ice: blocks beat cubes, and the math
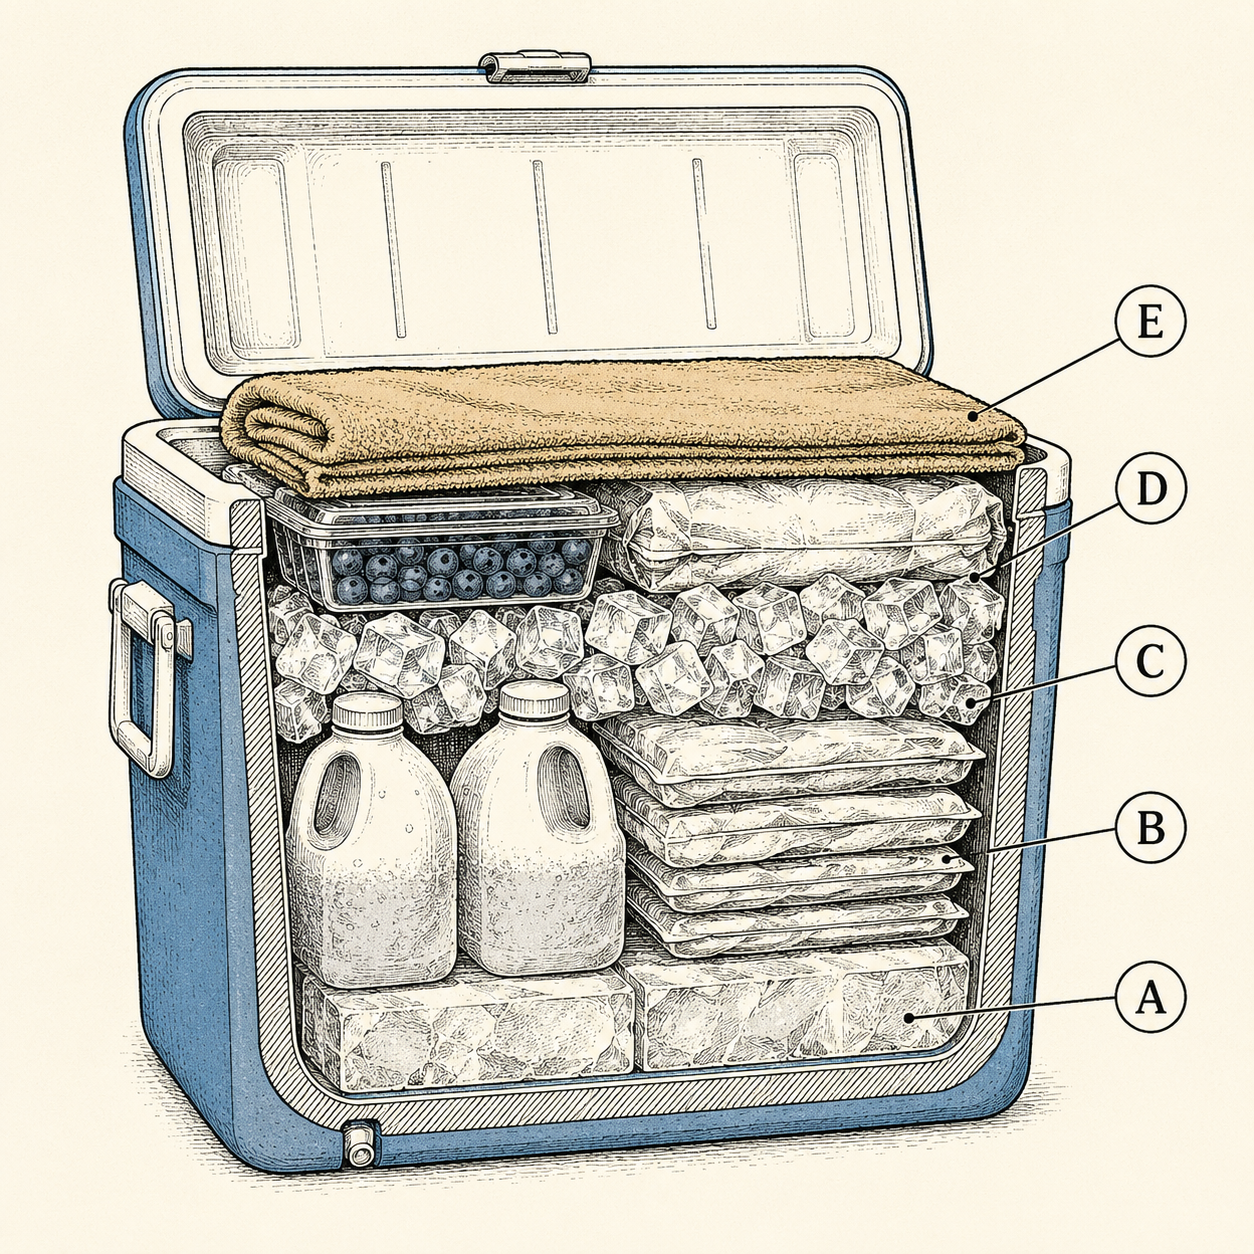
Block ice melts far slower than cubes (less surface area per pound), so the standard load is blocks on the bottom for endurance, cubes tucked in gaps for contact cooling, at a total of roughly 2 pounds of ice per pound of food, or two-thirds ice by volume for multi-day trips. Make blocks free by freezing water in loaf pans, milk jugs, or bottles days ahead, which costs nothing, starts your freezer working two days before the trip, and hands the crew drinking water as each block retires.
Frozen jugs and bottles are the recommended block format for one reason experienced campers all converge on: no meltwater slosh. Loose block melt eventually swims your cheese; a jug's melt stays in the jug and chills as liquid, then gets drunk. The trade is slightly worse contact cooling than loose ice, which the cube layer fixes.
On draining: leave the cold meltwater in unless food is floating in it. Cold water at 33°F chills better than the air that would replace it, and every drain-and-slam cycle costs cold. The exception is anything unsealed sitting in water (label soup, soggy produce), which is really a packing error: waterproof containers below the waterline, dry goods above it.
Packing order and the air problem
Pack in layers by melt schedule: blocks and frozen anchors on the floor, ice-adjacent proteins next, then dairy and produce in waterproof boxes, then the fragile and the soon-to-be-eaten on top, with cubes poured into every void and a folded towel or crushed newspaper filling the headspace under the lid. Air is the enemy the checklist forgets: every void is a pocket of warmth that re-heats each time the lid opens. Fill it.
Two organizational moves pay all weekend. First, bin the layers: small plastic boxes or heavy zip bags grouped by meal mean one reach retrieves dinner instead of a five-minute excavation with the lid gaping. Second, map the cooler out loud at packing time ("breakfast stuff back left, milk front right") to the people who'll open it, because the family that knows where the milk lives opens the lid for eight seconds, and the family that doesn't holds committee hearings over open ice.
Raw meat discipline rides along: double-bagged, always below and never touching ready-to-eat food, exactly like the fridge at home but with higher stakes and no sink. The cutting board that touched raw chicken washes in hot soapy water before anything else lands on it (Chapter 15's wash station, mid-meal edition).
The 40°F line and the two-hour rule
Food safety at camp is two numbers: perishables stay below 40°F (4°C), and anything perishable left out between 40°F and 140°F (60°C) gets two hours maximum before it's trash, one hour when the air is above 90°F (32°C). Those aren't camp rules; they're the same USDA danger-zone rules your kitchen lives by, enforced here by a $4 fridge thermometer that lives in the cooler and gets glanced at like a fuel gauge. Forty is the line.
The thermometer converts guesswork into a reading you can act on without debate: above 40°F, add ice now or start the triage, and let the number overrule the optimist at the table. What the rules mean in practice: the mayo salad doesn't tour the picnic table all afternoon (serve, then straight back down), lunch meat comes out for assembly and returns, and the "it was only out during the hike" leftovers get the sniff test's honest cousin, the calendar test: when in doubt, out. A weekend of camping is a bad trade for three days of the illness Chapter 6 already named as camping's most common.
The two-cooler system
The single biggest lid-discipline upgrade costs nothing: run two coolers, one for drinks (opened constantly, ice replaced cheaply) and one for food (opened at meals only, ice preserved). Households with kids report the food cooler's ice lifetime roughly doubling on this change alone. Two boxes. Different jobs.
The logic is traffic engineering. Drink retrieval is 80% of cooler openings and needs zero food-safety integrity; food storage needs maximum integrity and only six openings a day. Separating them assigns each job the right vessel: the drink cooler can be the cheap old one (its ice is expendable and its contents are sealed cans), while the food cooler gets the better box, the thermometer, the shade, and the "ask before opening" rule. A third, tiny lunch cooler for the day's grab-and-go extends the same principle on longer trips.
Placement finishes the system, per Chapter 15: food cooler in deep shade under the table (rotate with the sun; shade moves), lid latched, ideally with a wet towel draped over it in heat (evaporative cooling is free). The car trunk is not storage; a closed car in summer sun runs 30–40°F above ambient and cooks coolers from outside.
Buying: the rotomolded question
Premium rotomolded coolers (thick-walled, bear-certified, gasket-lidded) genuinely hold ice 2–3 times longer than standard coolers, and most campers still shouldn't buy one first. For weekend trips with re-ice access, a $40–80 standard cooler plus this chapter's technique delivers everything the weekend asks; the premium box earns its multiple on 4+ day trips, desert heat, and bear-locker country.
What the premium buys, honestly: wall thickness (real), gaskets and latches (real), bear certification where lockers are absent (Chapter 45; genuinely valuable), and durability measured in decades. What it doesn't buy: immunity from warm packing, browsing kids, or sun, which is why the disappointed-owner review is a genre ("kept ice two days, not seven": packed warm, opened often, parked sunny).
Middle paths exist and are quietly excellent: the "five-day" tier of conventional coolers splits the price difference, and a used chest freezer's worth of frozen jugs upgrades any box. Buy technique first, walls second.
When the ice runs out (and no-cooler camping)
Ice failure has a triage order: eat the vulnerable (thaw-stage meats get cooked tonight, dairy gets used or binned), consolidate the survivors into one cooler with all remaining ice, demote the rest to dry storage, and re-plan the menu around the shelf-stable reserve. The reserve is a Chapter 18 planning habit: every trip carries one no-cooler dinner (pasta and jarred sauce, curry pouches and rice) so ice failure costs a menu swap, not a hungry night.
No-cooler camping is also just a style, and a liberating one for short trips: hard cheeses, salami, tortillas, peanut butter, oatmeal, dried fruit, canned and pouched proteins, produce that shrugs at room temperature (apples, oranges, carrots, cabbage, onions, potatoes). Most of the world's camping happens this way, and a weekend of it simplifies everything: no ice math, no 40°F line, no lid politics. Just food. Chapter 18 builds full menus in this mode, and backpackers live there permanently.
Trailhead Takeaways
- Cold is packed, not created: freeze the freezable, fridge the rest, pre-chill the box overnight with sacrificial ice.
- Blocks (frozen jugs) on the floor for endurance, cubes in the gaps for contact, 2:1 ice-to-food, towel under the lid.
- Keep cold meltwater unless food swims in it. Waterproof below the waterline, dry goods above.
- Two numbers run food safety: below 40°F in storage; two hours max in the danger zone (one hour above 90°F). The $4 thermometer settles arguments.
- Two coolers: drinks (browsed, expendable ice) and food (meals only, protected ice). Shade both; never the car trunk.
- Rotomolded walls are real and still the third-biggest factor, behind packing temperature and lid discipline.
- Every trip packs one no-cooler dinner. Ice failure becomes a menu swap.
Where Trips Go Sideways
- The warm load-out. Room-temperature cooler, shelf-temperature drinks, a "we'll ice it at the gas station" plan: the first bag of ice died cooling the box and the second died cooling the soda. Saturday's milk never had a chance. The trip was lost in the driveway.
- Fridge-style browsing. Forty openings by sundown, each a full air exchange, each paid in ice. The two-cooler split plus a told-out-loud map cuts openings by three-quarters without a single argument.
- The floating label soup. Everything unsealed took on water because dry goods rode below the melt line. Waterproof boxes low, dry cargo high, and meltwater goes from menace to asset.
- Sunday's chicken, Friday's danger zone. Raw chicken packed merely "cool," touched 45°F by Saturday, and the weekend's plan met the when-in-doubt rule at real cost. Proteins travel frozen and get promoted up the menu as they thaw.
- The trunk pantry. "It's insulated, it'll be fine in the car": the closed trunk hit triple digits by noon and the cooler fought a 40-degree handicap all day. Shade, ground, wet towel. The car is an oven that drives.
Frequently asked
How long will ice last in a cooler?
With the full technique (pre-chilled box, frozen contents, 2:1 blocks-and-cubes, shade, lid discipline): 2–3 days in a standard cooler, 4–6 in a premium one. With none of it: one hot day in either. Packing temperature and opening frequency dominate; the walls come third.
Should you drain the water from a cooler?
Not routinely. Meltwater at just-above-freezing chills contents better than the warm air that replaces it on draining. Drain only when unsealed food is sitting in water, which is really a packing fix: waterproof containers and jugged ice below, dry goods above the waterline.
What is the 2-hour rule for food?
Perishables left between 40°F and 140°F get two hours total, cut to one hour when the air tops 90°F, then they're discarded, not sniffed back into service. Serve from the cooler, return promptly, and let the little fridge thermometer referee the borderline calls.
Are expensive rotomolded coolers worth it?
For trips of four-plus days, desert heat, or bear country without lockers: yes, the wall thickness and certification pay their way. For re-iceable weekends: technique matters more, and a standard cooler run cold embarrasses a premium one run casually. The bear certification matters most where lockers are absent and a resistant box is required. Buy the habits first; they're free and they transfer.