Part IV · Dressing for Outside
Why You Get Blisters on Your Heels
Happy Feet, Long Miles
How do you break in hiking boots?
Gradually, over two weeks, in escalating doses: hours around the house, then errands and dog walks, then a short unloaded hike, then a loaded one, watching for hot spots at every stage. Leather midweights need the full program; fabric hikers need days; trail runners need none, which is half their sales pitch.
What break-in actually does: softens the boot's stiff zones (ankle collar, flex crease, heel counter) and molds footbed and leather to your specific foot, while your skin simultaneously toughens at the contact points. It's a mutual negotiation, and doses are how negotiations go well. What break-in does not do, carried over from Chapter 25 with emphasis: fix a bad fit. A pressure point at hour one is a flaw, not a phase; back it goes.
The classic failure is skipping the program: new boots, straight to an eight-miler, and the trip is a blister documentary by lunch. The program costs zero extra time (you were wearing shoes anyway) and delivers boots that disappear on the trail, which is the entire goal: feet you never think about.
Lacing: the free fit adjustments
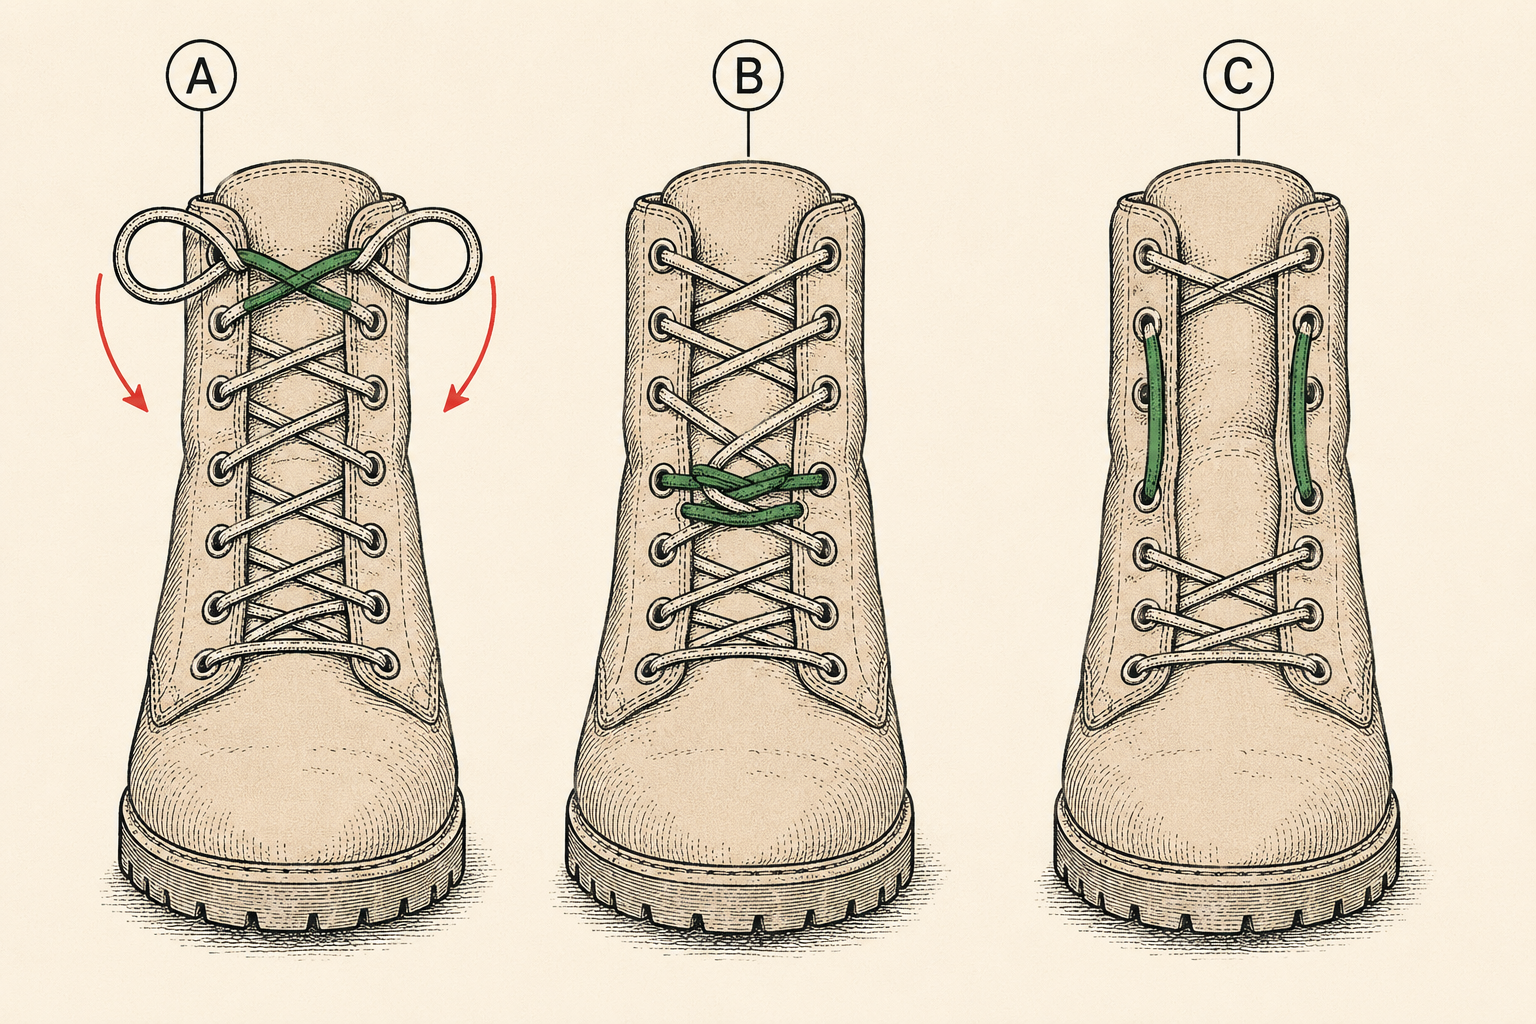
Laces are the boot's tuning system, and three techniques cover nearly every fit problem: the heel lock (runner's loop) that pins the heel down using those extra eyelets you've been ignoring, the surgeon's knot that holds different tensions in different zones, and window lacing that skips pressure over a sore instep. Every one is learnable in two minutes on a kitchen chair.
The heel lock, for heel slip (the #1 blister cause): lace normally to the top pair of eyelets, feed each lace end into its own side's extra eyelet to form a loop, cross the laces and thread each through the opposite loop, then pull down and back before tying. The loops cinch the ankle collar around the heel without strangling the forefoot, and heel slip drops to nothing.
The surgeon's knot, for the loose-forefoot-tight-ankle foot (or vice versa): at the eyelet where you want tension to change, wrap the laces around each other twice instead of once and continue; the double wrap locks tension below it. Two of them (mid-foot and ankle) turn one lace into three independent zones.
Window lacing, for a pressure point on the instep: at the sore spot, skip the cross and run laces straight up to the next eyelet on the same side, leaving an open "window" over the tender area. Pressure gone, hold retained.
Re-lace during the day like it's normal, because it is: feet swell (loosen at lunch), descents demand locked heels (tighten and heel-lock at the summit), and the hiker fiddling with laces at the trail junction is running the system, same as the layer-shuffler in Chapter 23.
The 60-second hot spot rule
A hot spot (that warm, rubbing awareness on heel or toe) gets sixty seconds of response, immediately, no summit-first negotiations: stop, shoe off, look, tape the spot, fix the cause (sock wrinkle, grit, lacing), and resume. Every blister on every trail was once a hot spot that someone decided could wait until the overlook.
The physics of urgency: friction plus moisture plus heat separates skin layers, fluid fills the gap, and the process runs minutes once it starts, not hours. At the warm-awareness stage, tape converts the outcome to nothing; at the visible-bubble stage, the next three days are management. The stop costs ninety seconds including pack-off; the blister costs the trip's remaining comfort. There is no math by which walking on qualifies, and yet.
Group protocol, since pride is the actual obstacle: the trip leader announces the rule on day one ("hot spots are a mandatory stop, nobody apologizes"), and kids get checked at every break because they will not volunteer (Chapter 51: a quiet kid limping is a kid protecting the trip's schedule; teach them the rule works the other way).
Tape, and the pre-taping habit
The kit that lives in every daypack's first-aid pouch: a roll of kinesiology-style sports tape or the hiker-classic zinc-oxide tape (tenacious, cheap, stays on wet feet for days), plus a few pre-cut moleskin donuts and blister bandages. Duct tape works in a pinch and takes skin with it later; it's the backup, not the plan.
Application rules that decide whether tape helps or wads: skin clean and bone dry (an alcohol wipe, then air), corners rounded (Chapter 13's patch law, on skin), edges pressed smooth with body heat, and the tape extending well past the friction zone. On heels, one smooth strip up-and-over; on toes, a wrap that doesn't strangle.
Pre-taping is the graduation: feet blister in personal, repeatable places (that left heel, that pinky toe), and taping those spots at the trailhead, before anything happens, prevents what the 60-second rule would otherwise catch mid-trail. Blister-prone hikers who adopt the pre-tape ritual routinely stop needing the rest of this chapter, which is its highest recommendation.
When the blister already happened
An intact blister that doesn't hurt under pressure stays intact (the roof is sterile dressing nature already applied): cushion it with a moleskin donut (a ring around, never a pad on top), cover, hike on. A tense, painful blister that will clearly rupture in the boot anyway gets drained deliberately: clean the site, sterilize a needle (flame or alcohol wipe), puncture low at the edge, press the fluid out, leave the roof intact, dress with antibiotic ointment and a donut-plus-cover.
The leave-the-roof rule is the whole procedure's spine: that skin layer is the wound's best bandage, and tearing it off converts a blister into an open sore with the trip's remaining miles still ahead. A blister that's already torn open gets cleaned (treated water, soap if handy), trimmed of loose dead skin with sanitized scissors, ointmented, and dressed like the abrasion it now is, checked daily for the redness-warmth-swelling trio that means infection and a doctor (Chapter 48 carries the wound-care thread from here).
Evening care at camp closes the loop: shoes and socks off early, feet washed and air-dried, dressings changed, camp shoes on (Chapter 25 knew), and tomorrow's plan adjusted honestly if a foot is genuinely damaged. A rest morning beats a limped week.
Trail foot care: the boring routine that works
The all-day routine of people whose feet never make the trip report: dry socks on schedule (change at the soak point, not the destination), grit evicted immediately (the pebble negotiated with for a mile costs more than the stop), feet aired at the long break (shoes off, socks in the sun, ten minutes of evaporation), and toenails trimmed short and straight across before every trip (downhills find long nails; blackened toenails are a fitting error or a trimming error, usually both).
Two habit upgrades for long days: a thin film of anti-chafe balm or foot powder on friction-prone zones at the morning sock-up (moisture and friction are the enemy's whole army; both products attack the alliance), and the lunchtime sock rotation on wet days (wet pair clipped to the pack lid, per Chapter 25, dry pair on, repeat forever).
None of this is glamorous, which is the point and the pattern of the whole chapter: foot problems are cheap to prevent, expensive to have, and almost entirely voluntary. The hikers with twenty-mile days and boring feet aren't lucky. They stop for sixty seconds a lot.
Trailhead Takeaways
- Break-in is doses: house, errands, short hike, loaded hike, two weeks for leather. It softens stiffness; it never fixes pressure points.
- Laces are the tuning system: heel lock for slip, surgeon's knot for zones, window for instep pain. Re-lace at lunch and summits like a normal activity.
- Hot spots get sixty seconds, immediately. Every blister was once a stop somebody skipped.
- Tape on clean dry skin, corners rounded, edges pressed. Pre-tape your known spots at the trailhead and retire the problem.
- Intact roofs stay on: donut and cover. Drain only what will burst anyway: sterile needle, edge puncture, roof preserved.
- Dry socks on schedule, grit out instantly, nails short and square, feet aired at breaks. Boring is the technique.
- Kids don't volunteer foot pain. Check at every break.
Where Trips Go Sideways
- Box-fresh boots, eight-mile debut. The break-in program compressed into one trail day, paid in matching heel blisters by lunch. Two weeks of ordinary wearing would have cost nothing.
- The summit-first hot spot. "We'll deal with it at the top" gave friction forty more minutes, and the warm spot at the switchback was a full bubble at the cairn. Sixty seconds, when it whispers. It never gets cheaper.
- Peeling the roof. The satisfying tear converted a manageable blister into an open sore with eleven trail miles remaining. The roof is the dressing. Donut around, cover over, leave it be.
- The negotiated pebble. One pebble, one "at the next flat spot," one mile: a bruise-blister under the arch that outlasted the vacation. Grit stops are free. Take all of them.
- Duct tape directly on the hot spot, removed at camp. The tape held heroically and left with the top layer of skin. It's the backup for when the real tape ran out, applied over a bandage island, never bare.
Frequently asked
How long does it take to break in hiking boots?
Fabric-and-mesh hikers: a few days of ordinary wear. Leather midweights: about two weeks of escalating doses (house, errands, short hike, loaded hike). Full-leather heavyweights: longer, and you'll know why you bought them. Trail runners: zero, which is a fair part of their argument.
What is the best way to prevent blisters when hiking?
Stack the preventions: footwear fitted by Chapter 25's method, wool or synthetic socks changed when soaked, pre-taping your personal hot spots at the trailhead, and the 60-second rule the moment anything rubs. Blisters need friction, moisture, and time; every habit above deletes one ingredient.
Should you pop a blister from hiking?
Only if it's tense, painful, and certain to rupture in the boot anyway: clean skin, sterilized needle, puncture low at the edge, press fluid out, keep the roof intact, dress with ointment and a moleskin donut. Painless intact blisters stay sealed; torn ones get cleaned and treated as open wounds.
Why do I get blisters on my heels every hike?
Heel slip: the boot's heel pocket is lifting off your heel each stride, and friction is doing the arithmetic. Fixes in order: the heel-lock lacing (two minutes, free), a thinner or thicker sock to change the fit, an insole that seats the heel deeper, and if slip persists through all three, a differently shaped boot. The heel lock alone fixes most cases the same afternoon.